— Network Options and Setup — Single LAN and Internet —
Network Options and Setup
Single LAN and Internet
|
In the case of needing Remote Clients to access DETEXI NVR from the Internet and get live images from the cameras you must open a set of IP addresses and port numbers in your configuration. This allows for computers anywhere on the Internet with the Remote DETEXI Client installed to authenticate with the DETEXI NVR in order to view and control live and recorded video.
|
— Network Options and Setup — Single LAN and Internet — Camera Setup —
Network Options and Setup
Single LAN and Internet
Required Camera Setup —
Each camera must be setup properly in order to see the router as its gateway to the Internet. This can be done through the HTML interface provided by the camera.
Depending on the camera, the location of the settings will be slightly different but they will typically be found in the Network or LAN settings in the camera.
- The Subnet Mask should be set to 255.255.255.0 (as typical)
- The Default Router or Default Gateway should be set to internal IP address of the router connecting modem to the LAN — 192.168.100.1 in the diagram.
|
— Network Options and Setup — Single LAN and Internet — NVR Setup —
Network Options and Setup
Single LAN and Internet
Required NVR Setup —
- Define external IP address
- Example
The NVR must now hold the information for two different connection paths for each camera — one to hand off to clients inside the LAN, and one to hand off to clients on the Internet.
There is only one external IP address which all the cameras and the NVR will need to share for the Internet clients. For this reason, we will be assigning each camera to a port on that IP address. It is good practice to use consecutive ports directly following the port listened by the NVR for communications — 2080 by default.
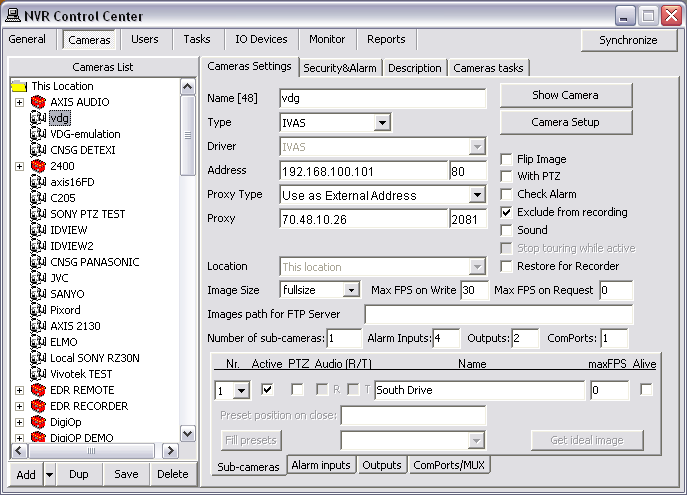
The DETEXI NVR is designed to handle such a configuration easily. In each camera definition, define both IP addresses and their appropriate ports using the Use as External Address proxy type. In this example, the external IP address is 70.48.10.26.
- In the NVR Control Center go to Cameras — Cameras Settings.
- Choose a camera from the Cameras List.
- Select Use as External Address from the Proxy Type drop-down list.
- Type both IP address and port number into Proxy input fields.
|
Each camera would be configured similarly. With the addressing scheme in this example, the cameras internal and external addresses and ports would be as follows —
| Camera |
Internal IP address |
External IP address |
| IP |
Port |
IP |
Port |
| 1 |
192.168.100.101 |
80 |
70.48.10.26 |
2081 |
| 2 |
192.168.100.102 |
80 |
70.48.10.26 |
2082 |
| 3 |
192.168.100.103 |
80 |
70.48.10.26 |
2083 |
|
— Network Options and Setup — Single LAN and Internet — Router Setup —
Network Options and Setup
Single LAN and Internet
Required Router Setup —
Finally, the router between the LAN and the Internet must be configured with port mapping, to enable communications to the cameras and the NVR on the external address. In addition to the cameras, we must map the NVR and the Archive ports.
By default the Archive ports are 60000 and 60001, but are configurable in the NVR Socket Server. The following internal IP addresses and ports will need to be mapped the external ports specified on the external IP address —
| Name |
Private IP address |
Range |
Private Port(s) |
Public Port(s) |
| NVR |
192.168.100.100 |
No |
2080 |
2080 |
| Camera 1 |
192.168.100.101 |
No |
80 |
2081 |
| Camera 2 |
192.168.100.102 |
No |
80 |
2082 |
| Camera 3 |
192.168.100.103 |
No |
80 |
2083 |
| Archive |
192.168.100.100 |
Yes |
60000-60001 |
60000-60001 |
- Configurations will be different depending on the type of router being used. Refer to your router’s manual for instructions on Port Mapping or Port Forwarding.
- Your router may not give you the option of entering a private port. In such a case, the router will assume that the internal port is the same as the external port. In this case, the cameras can be configured to communicate on whatever port you need rather than port 80 on the internal address.
This option should be in the Network or LAN section of the camera’s admin page. This would require the internal port to be configured to match in the NVR as well.
|


 DETEXI® Network Video Management System