— Access NVR Video Archive — Client Archive Tool —
Access NVR Video Archive
DETEXI Client Archive Tool
DETEXI Client Archive Tool pulls recorded video from the NVR archive transferring all frames in the time segment selected into local memory. For this reason, the amount of video that can be viewed at once is limited, and the initial load time is very affected by the network the video is being pulled across. Once loaded, however, this video can be viewed very quickly and efficiently at very high frame rates.
Search, Playback, Export Recorded Video from the NVR Archive—
Search for Video of Interest
Select Segment of Video
Playback, Export
Edit Captured Image
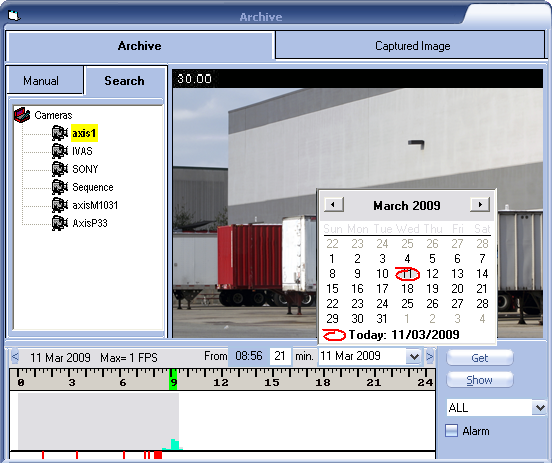
On the Client Start Page press ARCHIVE button — the Archive Tool built into the Client launches.
Double-click on the camera of interest in the Search — Cameras list to turn it yellow.
To choose the date of interest click on the down arrow next to today’s date ant select the date from the calendar.
Click Show button to show all recording activity for the chosen date. The timeline will be filled in with the Video Bar Graph, indicating the recorded video available for the day.
If motion detection is turned on in the recording schedule for the camera, the Green bars indicate the amount of motion detected within each minute of video.
The Solid Gray around the motion bars indicate continuous recording.
Red bars indicate alarm video (recorded due to an alarm).
The height of each bar indicates how much video (of the given category) was recorded in that minute.
A combination of solid gray and green bars are seen when a Continuous Recording with Motion Detection schedule is configured.
To select the segment of video for viewing, right-click and drag on the time line above the Video Bar Graph to highlight the time segment of interest. If no segment is selected, all video in the current view is considered selected.
Be careful not to select too large period of time, since loading can take a long time depending on the network resources. The maximum amount of video that can be loaded at once is 10000 frames.
With video selected, click the Get button to begin loading the section of video into memory.
Before clicking Get button, the Alarm checkbox can be checked to load only the alarm video (recorded due to an alarm) for that period of time rather than the continuous and motion video.
While the video is loading, the Get button changes to a Break button, showing the current status of the load. If the load is taking longer than desired, this button can be used to stop the load, and whatever video was loaded to that point will be viewable.
A combination of gray and green bars are seen when a Continuous Recording with Motion Detection schedule is configured.
Once a segment of video is loaded for viewing, the video playback control panel appears, with all video currently loaded in memory listed at the bottom. Many situations may call for multiple sections of video listed there.
Double-click the portion of video listed to view the first frame.
Playback control panel includes the following buttons from left to right — Play Forward, Play Backward, Pause , Frame Forward, Frame Backward.
The Frame slider can be used to quickly select a playback position within the video clip, and Speed slider — to adjusts the playback rate in FPS (Frames Per Second).
Video can be exported in the form of a snapshot picture, or AVI format movie. Press Capture button to save a single frame of the video and follow to the Captured Image panel in order to enhance and save the snapshot.
To export selected recordings as an AVI format movie — when playback is stopped, click the Save AVI button to begin exporting the video from the current location until playback is stopped again.
It may be necessary to apply compression during the export in order to lower the file size. A compression type can be applied if desired in the Client Settings — Show Advanced Settings in the Capture section.
Once video of importance is found, it is often necessary to be able to export that video to a universal format for distribution to management, the police, or other authority. This can be done with either the Capture or Save AVI features. Clicking Capture button will save a single frame of the video and transfer it into the Captured Imagepanel for editing. This captured image can be adjusted as needed and saved as a JPEG file.


 DETEXI® Network Video Management System