— Centralized Control and Management — Managing Domain Users —
Centralized Control and Managemen
Managing Domain Users
The NVR Domain Controller maintains a
single users list with security information for all domain users and authenticates all Remote DETEXI Clients’
access. When Remote DETEXI Clients connect to domain resources such as cameras, settings or recorded video, they will be required to
authenticate with user settings defined in the NVR Domain Controller.
The NVR Domain Controller has the ability to provide different lists of cameras from
any NVR location to different users, only allowing users to see and interact with the cameras they have privileges for. In addition, permissions such as PTZ control, maximum connection time, task control, etc. are configurable on a per-user basis.
- Any child NVR in the domain can have its own users list. This is not forbidden but not necessary in the NVR Domain Controller configuration. These users have access to this NVR resources only.
- Select Location
- Add User
- User Cameras to Interact
- Synchronize NVR Location
To add a new user to the domain controller users list select a location first —
- In the Domain Controller NVR Control Center — Users — User Information.
- Select This location from the Servers Locations list. Update the list.
- This Location means the NVR Domain Controller.
- To update a child NVR individual users list select the NVR by location name. Authentication will be required.
- From the domain controller NVR Control Center users can update not only the domain controller users list but any child NVR individual users list also.
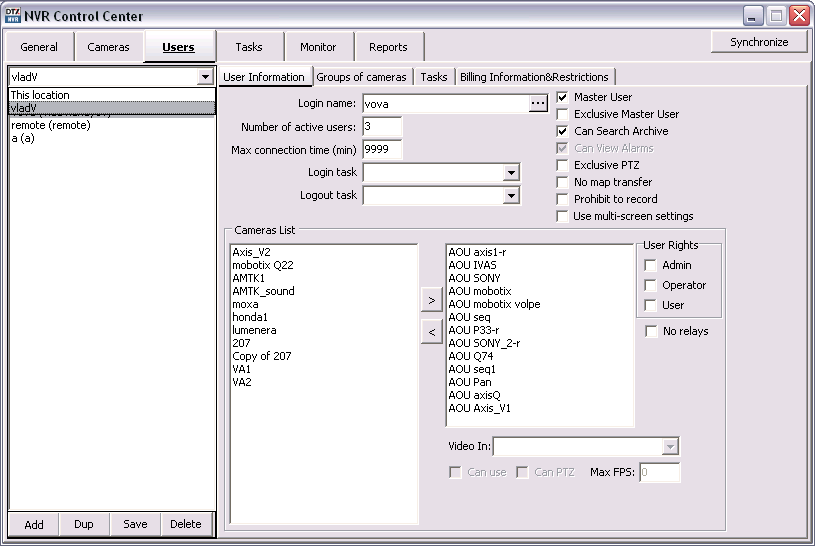
- Below the Users List click Add button to open blank User Information dialog;
— or —
Click Dup button to open a copy of selected user settings for editing.
- Enter a single word, case-sensitive, alphanumeric User Name to use to login to the NVR.
- Enter a single word, case-sensitive, alphanumeric User Password and re-type it to the User Password Confirmation to be sure it is typed as desired.
- Enter the Number of Active Users to define the number of Client instances the user can be signed into simultaneously.
- Enter Max connection time to define the number of minutes user can be continuously connected to the NVR before the connection will be terminated. User may login again if desired. A value of 9999 designates no time limit.
- Check Master User checkbox to give the user permission to terminate other user sessions from the Client — Get Users.
- Check Can Search Archive checkbox to give the user permission to view NVR archive.
- Remember that User Cameras to Interact also must be setup.
To define the cameras user has access to —
- With the user selected choose the camera from the Cameras List at the left and click ">" button to add the camera permission to the user — the camera name appears in the selected cameras list at the right.
- Select the camera name in the selected cameras list at the right.
- Check proper checkbox under the User Rights to pass the previously configured camera authentication settings — Adm, Oper or User.
- It is necessary to assign the level of authentication allowed from this user to the camera defined in the NVR Control Center — Cameras — Security & Alarm.
- In most cases, the camera has only one username and password, with administrative privileges.
- Be sure that User Rights (Adm/Oper/User) settings make sense considering the authentication settings in the Security & Alarm.
- Check Can PTZ checkbox below the selected cameras list to give the user PTZ permission on the selected camera. This setting is enabled by default if the camera has PTZ capabilities when assigned to the user.
- Repeat steps 1-4 to add more camera permissions.
- Click Save button below the Users List to save user settings.
- The User Rights chosen for the first camera configured will automatically be assigned to each camera after that unless manually changed.
- PTZ permission is defined on a per-camera basis, and is enabled by default if the camera has PTZ capabilities when assigned to the user.
When you are ready for your changes to take effect, you should synchronize the services running on the NVR holding the updated users list with the current configuration.
- If updates were made to the domain controller users list click Synchronize button in the top right corner to activate the new configurations.
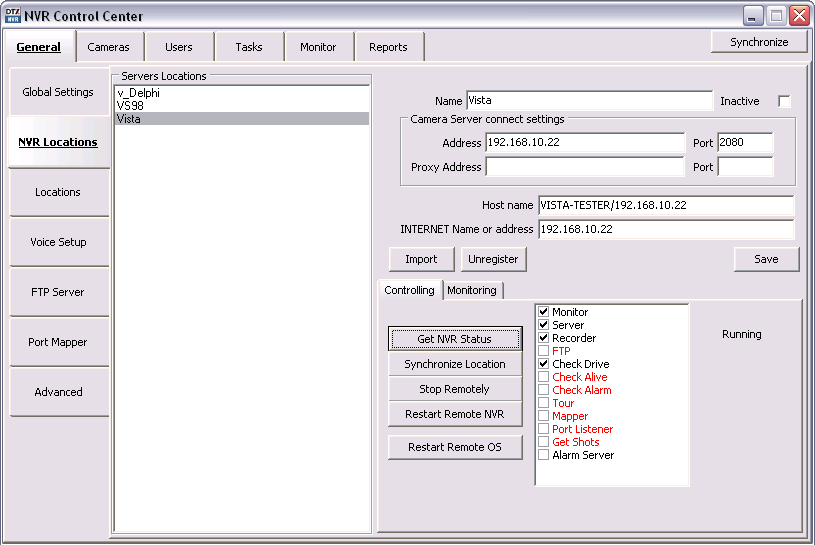
If a child NVR individual users list was updated —
- In the Domain Controller NVR Control Center go to General — NVR Locations.
- Select the NVR by its location name from the Servers Locations list.
- On the Controlling tab click Synchronize Location button to activate the new configurations.
- The NVR Domain Controller has the same graphical user interface named NVR Control Center as the NVRs just with expanded functionality.


 DETEXI® Network Video Management System


