One of the key functions in the DETEXI NVR is recording video. Recording functionalities include setting up the rules of recording as well as intelligent ways of searching for recorded video and exporting video to other systems.
In the DETEXI NVR video can be recorded on schedule (24/7 or other) with or without motion detection and on trigger (by motion or alarm).
Scheduled recording can combine both continuous and triggered recording instructions (within schedule).
Continuous recording normally uses more disk space than an alarm triggered recording. An alarm-triggered recording can be activated by, for example, video motion detection or an external input through a camera’s input port.
With scheduled recordings, timetables for both continuous and alarm or motion recordings can be set.
After selecting the type of recording method, the quality of the recordings can be determined by selecting the video resolution, and level of image compression. These parameters, as well as frame rate, will affect the amount of bandwidth used as well as the size of storage space required. The number of frames per second can be set in all recording modes.
Network video products can have varying frame rate capabilities, depending on the resolution. Full-motion video is 30 frames per second in NTSC video standard (in North America and Japan) and 25 frames per second in PAL video standard (in Europe). Some network cameras have the capability to do even higher frame rates.
Storage
The DETEXI NVR uses the standard Windows file system for storage, so any system drive or network attached drive can be used for storing video. An index of available video is stored in a separate file. The advantages of using a database for storing all settings and recording metadata, and using a file system, include:
The ability to manage shared access and ensure data integrity
The possibility to efficiently search for recordings
The ability to enable direct file access and record directly to disk
The NVR can enable more than one level of storage — that is, recording on a primary hard drive and archiving on local disks, network-attached drive, or remote hard drive. Users are able to specify how long images should remain on the primary hard drive before they are automatically deleted or moved to the archive drive.
Exporting Files
The DETEXI NVR record video using proprietary file formats but enable users to export recorded video —
To standard AVI (Audio Video Interleave) file format.
The proprietary format also can be exported along with a proprietary "player" — restricted DETEXI Archive Viewer.
The advantages of using the native recording format are additional security and data integrity as well as advanced playback features. The proprietary format can be encrypted and password protected. Additionally, the proprietary format can be more difficult to edit and can be used to preserve the chain of evidence.
— Administration and Management — Recording Methods —
Administration and Management
Recording Methods
Recording in the DETEXI NVR is either schedule based or event based (triggered), and many recording options are available.
Schedule Based Recording
Schedule based recording can be set up as continuous (24/7 or other schedule) with or without motion detection or triggered. An alarm-triggered recording can be activated by, for example, video motion detection or an external input through a camera’s input port. Scheduled recording can combine both continuous and triggered recording instructions (within schedule).
Recording without Motion Detection — video is recorded constantly while on schedule, without motion analysis being done.
Recording with Motion Detection — video is recorded constantly while on schedule, the video is analyzed and encoded with markers when motion is detected for faster and smarter replay.
Recording on Motion Only — video is analyzed constantly while on schedule, but only recorded when motion is detected.
Recording on Motion Alarm — video is analyzed constantly while on schedule; the alarm raises when motion is detected starting the alarm video recording and execution of assigned task. An assigned task must not include the Record Camera action because a video stream is already initiated.
Recording on Input Alarm — the hard input(s) of the camera are monitored while on schedule; when an alarm is detected the execution of assigned task starts. Recording of alarm video occurs if only an assigned task includes the Record Camera action, that initiates a video stream from the camera.
Event Based Recording
Recording on NVR event (Record Camera action is included in assigned task)— video is recorded for any defined camera when a chosen event occurs in the NVR.
The NVR response configuration is based on the NVR Task Execution Engine. In the NVR trigger is a set of criteria that, when met, starts the execution of assigned task. When an event is triggered, some of the common responses can occur, if configured. Recording occurs if assigned task includes the Record Camera action.
Record Camera action records alarm video for a user-defined camera or for the camera associated with the event that triggered it. The length, picture quality, and camera position of the recording can be defined if desired. An alarm snapshot can also be taken by this task.
Learning the NVR event management system should allow a better understanding of how to configure system settings including recording instructions.
— Administration and Management — Setup Recording Storage —
Administration and Management
Setup Recording Storage (Archive)
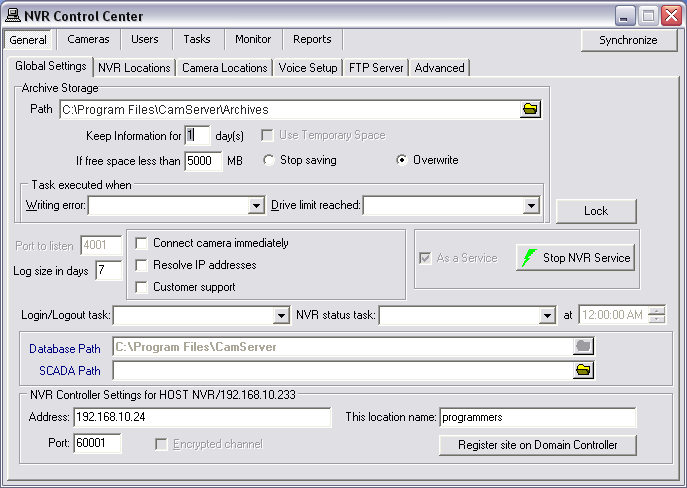
Specify where to store the images (by default, C:/Program Files/CamServer/Archives). Recordings will be deleted when the reserved hard disc space is full, or when the recording is older than the amount of days specified in Keep Information for [ ] day(s). To prevent the hard drive from becoming full If free space is less than (stop saving/overwrite) should be set.
In the NVR Control Center switch to General — Global Settings
Under Archive Storage — Path specify local or network location for the NVR recording storage by clicking on the browse button. The directory must be empty when chosen.
Specify Keep Information for [ ] day(s)
Set If free space is less than with a Stop saving or Overwrite option chosen.
Check Use Temporary Space checkbox if the archive is stored on a network device for more effective recording.
With proper planning, the configured data retention time should not allow the drive limit to be reached, and will act only as a safety net. If data is continuously overwritten based on the drive limit, unnecessary strain is placed on the processor and hard drive.
The Archive Storage settings cannot be set or changed while the NVR is running. If the NVR is running, you must first stop the services with the Start/Stop NVR Service toggle button. When the settings are done start NVR again.
— Administration and Management — Prevent Catastrophic Errors —
Administration and Management
Prevent Catastrophic Errors
There are several areas that should be checked constantly to insure the NVR can record —
Is there enough space to make a recording Are there enough system resources to make a recording
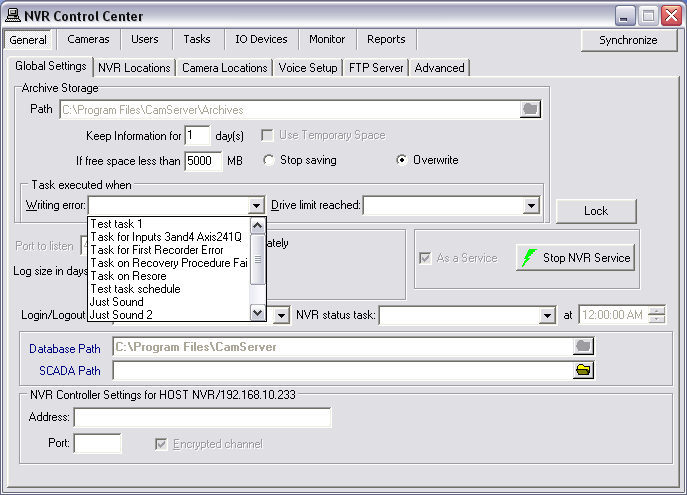
In order to take advantage of getting a notification/action in case a catastrophic failure occurs you must setup the Writing error and Drive limit reached tasks.
Writing error task initiates when the Recorder fails to record streaming data on the hard drive. It could be because of a hard drive error, a Windows error or the Recorder could not do its job because of lack of resources (usually an underpowered CPU).
Drive limit reached task initiates in case of free space for the system files or free space necessary for NVR functioning becomes too low. In some circumstances the Recorder service could even be stopped because the NVR cannot manage the given amount of information due to a lack of system resources. In this case you should reconsider your IP-devices Recording Schedule settings and /or Keep information for parameter and/or your hardware configuration.
If the tasks associated with these events are initiated you have to seriously reconsider your NVR settings and/or the hardware you are using.
Setup Catastrophic Error Tasks
In the NVR Control Center go to General — Global Settings
Under the Tasks executed when select an appropriate predefined task from the Writing error drop-down list and the Drive limit reached drop-down list.
With proper planning, the configured data retention time should not allow the drive limit to be reached, and will act only as a safety net. If data is continuously overwritten based on the drive limit, unnecessary strain is placed on the processor and hard drive.
— Administration and Management — Recording Services —
Administration and Management
Recording Services
There are two NVR services that should be running and monitored by the Monitor service in order to record — Recorder and Check Drive.
Recorder service records information and images from each video input into the NVR archive, according to the configured schedules, preferences, alarms and events.
Check Drive service monitors the condition of the storage path and device to confirm existence and available space for new video being recorded to the archive.
All NVR services are visible and configurable in the NVR Control Center — Monitor.
Check Alarm Service
If Recording on Input Alarm method is setup in a camera/video server schedule, the Check Alarm service responsible for watching the status of IP device inputs should also be running and monitored.
Check Alarm service monitors the hard inputs of connected video devices, and raises alarms when defined changes are seen on such inputs.


 DETEXI® Network Video Management System


 Recording in the DETEXI NVR is either schedule based or event based (triggered), and many recording options are available.
Schedule Based Recording
Schedule based recording can be set up as continuous (24/7 or other schedule) with or without motion detection or triggered. An alarm-triggered recording can be activated by, for example, video motion detection or an external input through a camera’s input port. Scheduled recording can combine both continuous and triggered recording instructions (within schedule).
Recording in the DETEXI NVR is either schedule based or event based (triggered), and many recording options are available.
Schedule Based Recording
Schedule based recording can be set up as continuous (24/7 or other schedule) with or without motion detection or triggered. An alarm-triggered recording can be activated by, for example, video motion detection or an external input through a camera’s input port. Scheduled recording can combine both continuous and triggered recording instructions (within schedule).
 Is there enough space to make a recording