— Access NVR Video Archive — Export Video in Proprietary File Format —
Access NVR Video Archive
Export Video in Proprietary File Format
DETEXI NVR records video using proprietary file format but enables users to export recorded video to the standard file format — AVI (Audio Video Interleave). The proprietary format also can be exported along with a proprietary player (restricted DETEXI Archive Viewer). The advantages of using the native recording format are additional security and data integrity as well as advanced playback features. Additionally, the proprietary format is more difficult to edit and can be used to preserve the chain of evidence.
- DETEXI Client Archive Tool and DETEXI Archive Viewer export recoded vido in AVI format.
Export NVR Video Archive module included automatically with the DETEXI NVR installation allows users to export, or back up the recorded video.
- File extension JPX is DETEXI proprietary file format
- Video can be selected for user-definable periods of time and specified cameras
- The module can export video or shots recorded by the NVR
To replay video exported in the proprietary file format on any computer the DETEXI Archive Viewer module —
ArchiveViewer.exe should be copied along with the video
(no installation required). The functionality will be restricted automatically.
- Launch Export NVR Video Archive
- Export Video from Specified Camera
- Export Video to a JPG Image Sequence
|
|
 |
To Launch the Export NVR Video Archive —
On the DETEXI NVR PC server open Export NVR Video Archive from Start — All Programs or click the program icon on your desktop.
|
|
- Launch Export NVR Video Archive.
- Choose Export Video or Export Shots from the list.
- Define the range of time to export video for — from dd1/mm1/yyyy1 hh1:mm1 to dd2/mm2/yyyy2 hh2:mm2
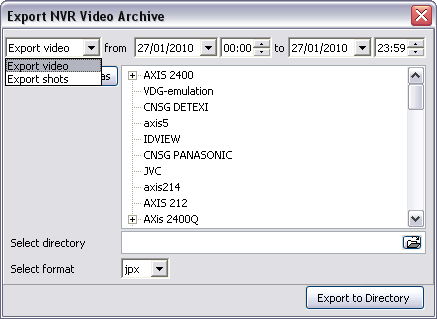
- Selected video can be exported as video (jpx file format), or as image sequence (jpg file format)
- When the range of time is defined select the camera(s) for which to export recorded video from the cameras list.
- Hold the Ctrl key to select multiple cameras
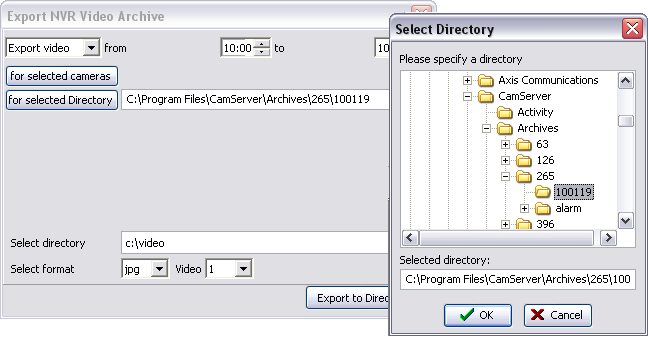
- Specify the directory to export video to in the Select Directory.
- Select JPX output format from the Select Format drop-down list.
- Finally, click Export to Directory button to begin export.
- The button will stay depressed while exporting — how long will depend upon the amount being exported
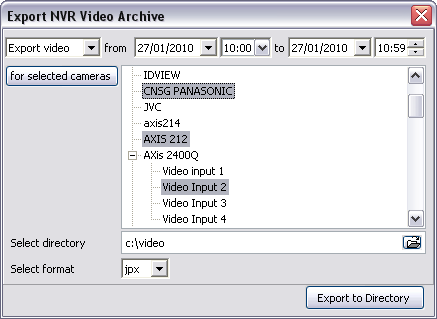
- Selected video can be exported as video (jpx file format), or as image sequence (jpg file format)
In some occasions it could be necessary to export video as a JPG image sequence.
- In this case, JPG output format should be selected from the Select Format drop-down list. Additional For Selected Directory button will appear.
- You can click on it to select video from directory, or click For Selected Cameras button to select from the cameras list.
- Selected video can be exported as video (jpx file format), or as image sequence (jpg file format)


 DETEXI® Network Video Management System


