
 |
 DETEXI® Network Video Management System DETEXI® Network Video Management SystemEXPAND YOUR CONCEPTS OF SECURITY |
  |
 |
| Javascript Tree Menu | |
|
|
|
|
|
— DETEXI Archive Viewer —
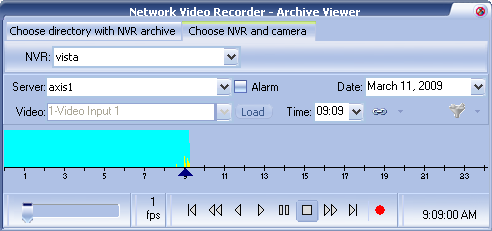
DETEXI Archive Viewer
When large amount of video need to be scanned for events the Archive Viewer is the tool of choice.
Rather than loading a collection of video into local memory, the Archive Viewer streams video directly from the NVR archive over the network. For this reason, a full 24 hours of data is at the user’s fingertips for viewing at all times without requiring a large initial load time. However, this limits user to slower possible playback speed — completely dependent upon the network connection between the Archive Viewer and NVR archive. It is not uncommon to see pauses in video playback for buffering of the video stream. To search and retrieve a recorded video —
The primary function of the DETEXI NVR is to record video, for search and replay at a later date. When video of importance is found in the NVR archives, it is often necessary to be able to export that video in a universal format for distribution to management, the police, or other authority.
Before exporting retrieved video, it is important to consider the size of the resulting file, to be sure that it can be delivered in an acceptable way. Uncompressed video can result in a very large file such as 1GB for only 2 or 3 minutes of video.
How to compress exported video —
|