— Schedule-based Continuous Recording — Confirm Recording Enabled —
Setup Schedule-based Continuous Recording
A
scheduled recording that records
continuously will archive video with the quality settings defined, as long as the defined schedule is valid — whether there is motion or not. In this configuration no motion detection is turned on at all, so the Recorder service does not analyze the video stream before archiving it.
Turning on
continuous recording requires one 24/7 schedule to be added and configured for the camera.
Confirm that recording is enabled for the camera —
- In the NVR Control Center — Cameras select a camera from the Cameras List.
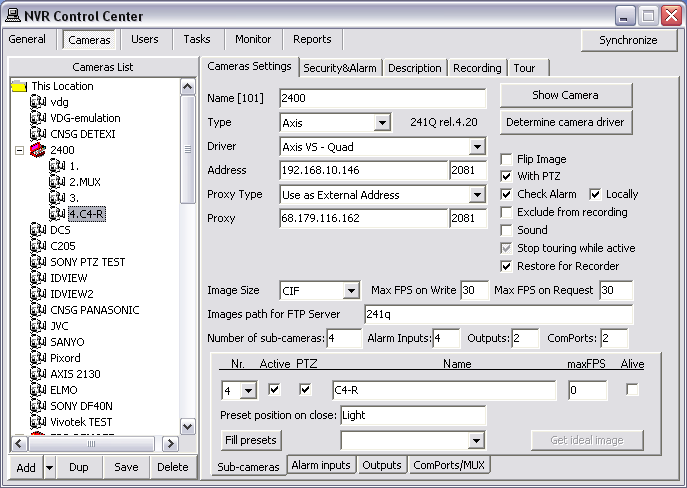
- In the Cameras Settings ensure that the Exclude from recording checkbox is unchecked and the Recording tab is visible.
- Continue to Setup 24/7 Recording Schedule & Video Quality .

— Schedule-based Continuous Recording — Setup 24/7 Recording Schedule & Video Quality —
Setup Schedule-based Continuous Recording
Setup 24/7 recording schedule & video quality to the selected camera —
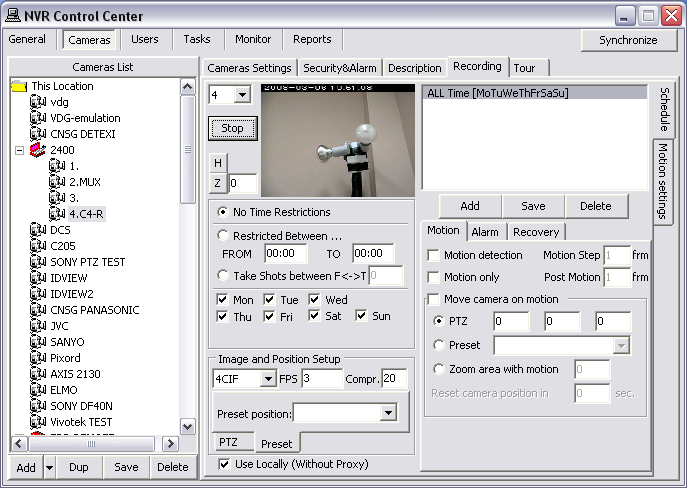
- Switch to the Recording.
- Click Add button under the Schedule list to add a new recording schedule.
- Leave No Time Restrictions radio button selected, and leave all days of the week checkboxes checked to configure a 24/7 schedule.
- To setup video quality under the Image and Position Setup —
- Select Resolution from the drop-down list the video will be recorded at. Higher resolution means better image quality, and larger file size (4CIF on the sample).
- Enter FPS — the number of frames per second that will be archived. Higher FPS means more fluid motion, and larger file size (3 on the sample).
- Enter Compression % which will be applied to the video before it is archived. Lower compression percentage means better image quality, and larger file size (20 on the sample).
- On the Motion tab Motion detection checkbox should be unchecked (motion detection set by default).
- Click Save button below the Schedule list to save the schedule item.
- Switch to the Camera Settings to select another camera to configure.

- After saving the schedule, it will be named based on the settings defined within it.
- In this configuration no motion detection is turned on at all, so the Recorder service does not analyze the video stream before archiving it. Motion detection and Motion only checkboxes under th Motion tab unchecked, Motion Step and Post Motion do not apply and are grayed out.
- Defining a recording schedule at a specific resolution, FPS and compression may affect live video streams from this camera — depending on whether the camera supports simultaneous video streams with different parameters such as this. Check the specifications of the camera in use.
— Schedule-based Continuous Recording — Start or Synchronize Recording Services —
Setup Schedule-based Continuous Recording
Start or Synchronize Recording Services
There are two NVR services that should be running and monitored by the
Monitor service in order to record —
Recorder and
Check Drive.
- In the NVR Control Center — Monitor the color of the service name indicates its status — blue while running , red while stopped.
- The checkbox next to a service name configures how it is affected by the Monitor service. If a service is checked, its status will be monitored and displayed.
To start or synchronize recording services —
- Go to NVR Control Center — Monitor.
- If the Recorder and Check Drive services were running and monitored during the configuration just click the Synchronize button to activate the new configurations.
If not — check Recorder and Check Drive checkboxes to enable monitoring and Monitor service will start them in approximately 30 seconds.

- If, for some reason, the user stops a service and it is selected to be monitored, it will be restarted by the Monitor service in approximately 30 seconds.
- During the system tuning you may need to disable restarting a service by the Monitor service. Uncheck the service checkbox to disable monitoring. Than you can click on the service name to turn it red to stop the service or blue — to run.

 DETEXI® Network Video Management System


