— DETEXI Client — Local and Remote DETEXI Client —
DETEXI Client
Local and Remote DETEXI Client
|
|
|
|
In the DETEXI Network Video Management system, video can be viewed from any point on the network. Using the DETEXI Client part of the DETEXI software, multiple authorized users can access live or recorded video at any time and from any networked location.
There are two different installations of the DETEXI Client: Local Client for the system administrator and Remote Client for the system users.
|
|
|
|
 |
Local DETEXI Client —
Installed automatically along with the DETEXI NVR is a useful system administrator tool for testing user configuration and basic functionality. It only connects to the local DETEXI NVR, does not require the NVR services to be running, and does not require authentication (authentication features are disabled).
|
|
|
|
 |
Remote DETEXI Client —
Installed stand-alone on any PC, or/and included automatically with the DETEXI NVR installation enables connection to any authorised DETEXI NVR available anywhere on the Internet or corporate network for remote viewing and control. Requires NVR settings configuration and authentication.
|
|
|
- For a high quality video viewing experience, it is crucial that DETEXI Client computers are equipped with a Graphics Card that can handle the live video and rendering required by the DETEXI Client application.
— DETEXI Client — Launch DETEXI Client —
DETEXI Client
Launch DETEXI Client
The DETEX system user interface — DETEXI Client — is developed with a focus on ease-of-use and intuitive handling with navigation tools providing quick access to cameras and recording in the system.
|
|
|
 |
Launch Local DETEXI Client —
Open DETEXI from Start — All Programs or click the program icon on your desktop.
|
|
 |
Launch Remote DETEXI Client —
Open Remote DETEXI Client from Start — All Programs or click the program icon on your desktop.
|
|
|
Start Page —
When the DETEXI Client is launched the Start page provides the list of cameras configured in the NVR. From the Start page all branches of the Client can be accessed. Users can organize and monitor network cameras and video encoders on their network — set up view groups, record, control the cameras’ audio, and pan/tilt/zoom and playback archived video.
|
— DETEXI Client — Remote Client Authentication —
DETEXI Client
Remote Client Authentication
Before Remote DETEXI Client can connect to a DETEXI NVR, the
Authentication Server must be configured. The Authentication Server defines the TCP/IP settings the Remote Client should use to connect to one or more NVR Servers.
- Login Prompt
- Authentication Server Setup
- Central Servers List
- Login
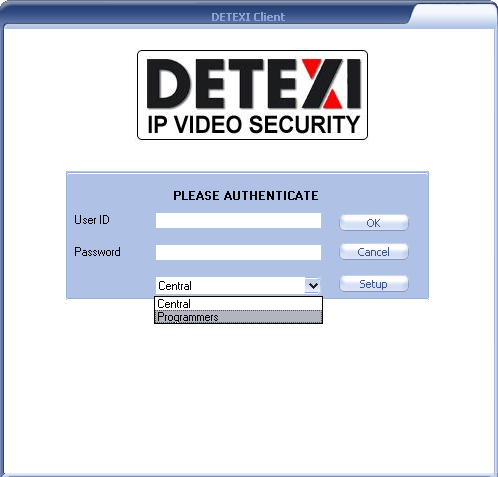
- Launch Remote DETEXI Client — the Login Prompt window appears. Since the Client is not yet aware of any server to authenticate with, authentication attempts at this time would fail. Click Setup button to enter the Client Settings.

- Authentication Server is one of underlying DETEXI NVR services. All services are visible and configurable in the NVR Control Center — Monitor.
[Authentication] Server service, also known as the CamServer, authenticates remote users connected to the NVR through the Remote Client. The CamServer is also responsible for tracking statistics about the remote user’s connections.
|
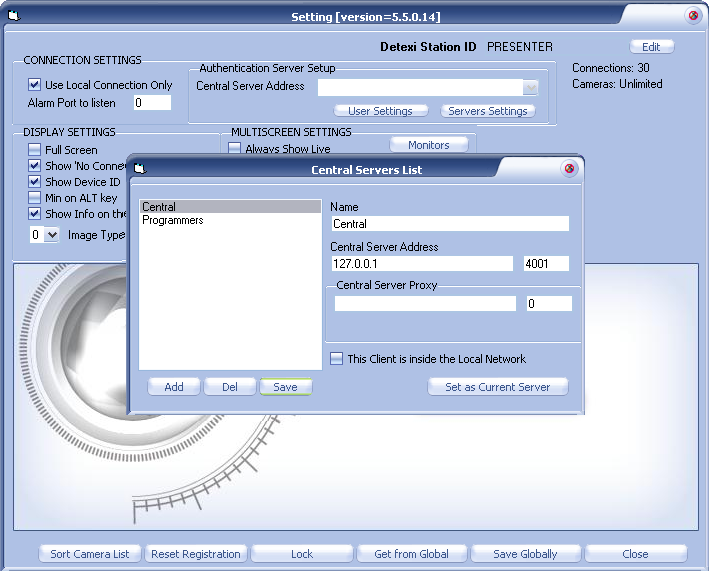
- In the Settings under the Authentication Server Setup click Servers Settings button to open the Central Servers List panel to define the connection settings for all DETEXI NVRs the Client will connect to.

- In the Central Servers List —
- - Click Add button to add a new Central Server configuration
- - Enter any descriptive Name for the server definition that will be used to distinguish between multiple servers.
- - Enter Central Server Address — IP Address and Port to Listen of the NVR Server being connected to.
- - Check This Client is inside the Local Network checkbox if all the cameras and Client belong to one network (for the optimization purpose).
- - Click Save button to save the settings.
- - Add more servers to the list.
- Choose a preferred central server address. Select a server from the Central Servers List and click Set as Current Server button — the selected server will be assigned as the default central server. The Central Servers List panel will close automatically.
- In the Settings click Close button to return to the Login Prompt.

- If required, in order to reach the NVR Server the Central Server Proxy could be setup — Proxy Address and Port to be communicate through. In most configurations, this information will not be necessary and can be left blank.
- If only one Authentication Server is setup make sure that Central Servers List panel was closed by pressing Set as Current Server button, or authentication will fail.
- If more than one Authentication Server is setup select one from the Login Prompt drop-down list.
If only one — it will be used automatically.
- Provide a valid User ID and login Password, and click OK button to open the Start Page.

- If only one Authentication Server is setup in Settings — Central Servers List make sure that Central Servers List panel was closed by pressing Set as Current Server button, or authentication will fail.
|

 DETEXI® Network Video Management System


