— Managing Cameras — Configure Tour —
Managing Cameras
Configure Tour
A tour enables PTZ camera to automatically move from one pre-configured position to the next in a predetermined order. The viewing time between one position and the next is configurable. Different tours also can be set up and activated during different times of the day.
- Setup Tour
- Setup Tour Schedule
To add a tour to PTZ camera configuration settings —
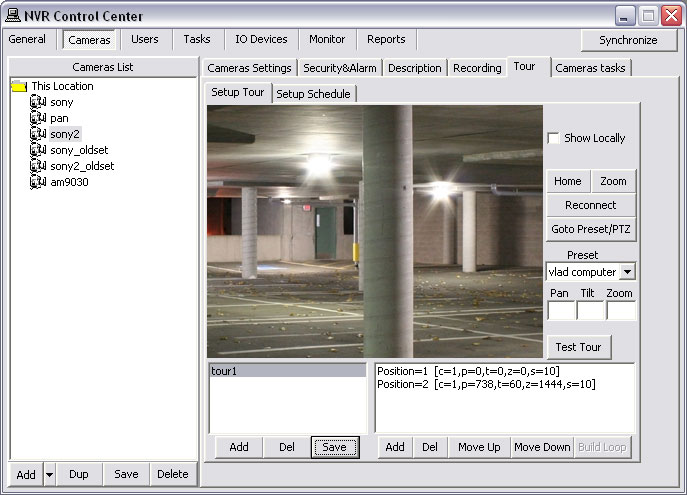
- In the NVR Control Center — Cameras select a PTZ camera from the Cameras List and switch to the Tour — Setup Tour — connection will be established.
- This connection is temporary and allows the camera’s tour settings to be configured and tested.
- If connection failed reconnect by clicking the Reconnect button.
- Show Locally checkbox can be check to connect to the camera using local IP address and port number (during configuration time only).
- Show Locally checkbox is only visible if camera has both an internal and external connections configured in the NVR Control Center — Cameras — Cameras Settings.
- Press Add button below the tours list and enter Tour Name when asked — the name appears in the list.
- In order to change camera position you can —
- Click anywhere on the image to pan, tilt camera
- Enter Zoom value and press Zoom button to zoom camera in/out
- Press Home button to set camera in a home position
- Enter Pan, Tilt, Zoom values or select a preset position from Preset drop-down list and press Goto Preset/PTZ button (no value equal 0).
- To add new position to the tour — click the Add button below the positions list and enter Stay in this position for (sec) when asked — the name appears in the list (position will be named based on the defined settings).
- If more than 2 positions were added the Build Loop button activates. Click the Build Loop button to add backward camera positions to the tour.
- Click the Test Tour/Stop Tour toggle button to test new tour (click once more to stop).
- Press Save button below the tours list to save the tour.
- The DETEXI NVR Tour service should be running and monitored by the Monitor service in order to enable cameras touring. All NVR services are visible and configurable in the NVR Control Center — Monitor
- Tour service moves PTZ cameras through a predefined series of locations according to defined schedules or on alarms or events.
After one or more tours were configured for the camera you can also schedule what tours (if any) should be activated during different days of the week and times of the day.
- In the NVR Control Center — Cameras select a PTZ camera from the Cameras List and switch to the Tour — Setup Schedule.
- Press Add button below the schedules list to add a new schedule.
- Leave No Time Restrictions radio button selected, and leave all days of the week checkboxes checked to configure a 24/7 continuous touring;
— or —
Select the Restricted Between radio button and define a time range FROM - TO and
leave proper days of the week checked to have the tour repeated these days only.
- Select a predefined tour from the Tour drop-down list the schedule will be applied to.
- Check Use locally (without Proxy) checkbox to connect to the camera using local IP address/port number during touring (optional).
- The checkbox is only visible if the camera has both an internal and external connections configured in the NVR Control Center — Cameras — Cameras Settings
.
- Press Save button below the schedules list to save the schedule.
- Repeat the steps to add more schedules.
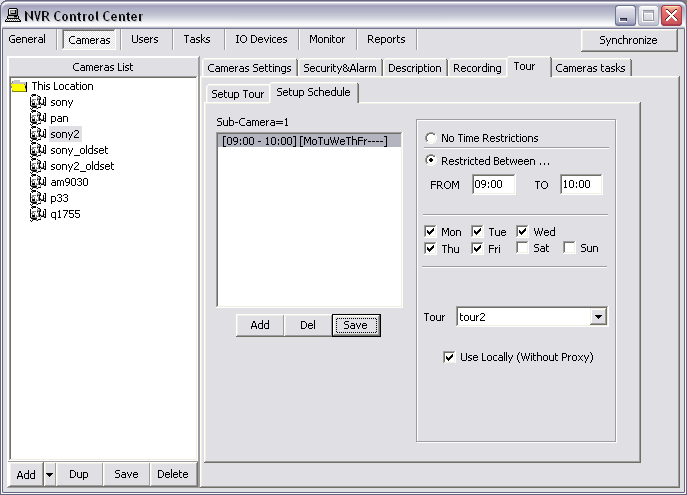
- After saving the schedule, it will be named based on the settings defined within it.


 DETEXI® Network Video Management System


