— Event Management —
Event Management
The DETEXI NVR has the ability to receive, process, and associate
events from different systems.
Events can be received from access control, intelligent video software, and the network video products themselves.
Once an event is
triggered, the NVR register the event, associate it with a video clip from a nearby camera, and alert an operator, or investigator by sending a notification or by having a window with streaming video pop up on a viewing terminal, or
respond any other configured way.
This allows remote monitoring stations (Remote DETEXI Clients) to become immediately aware of a change in a monitored environment and response to things that occur.
- Having event management functions in the NVR provides tremendous benefits. It enables more efficient use of bandwidth and storage space because there is no need for a network camera or video encoder to send any video for viewing or recording unless an event takes place.
- In addition, live monitoring of cameras is not required all the time. When an event takes place, alerts and notifications can be sent, and all configured responses (actions) can be activated automatically.
- Event management, which includes alarm handling, involves defining an event that activates a network video product to perform certain actions. An event can be scheduled or triggered.
Events can be triggered by, for example:
Input port(s) — the input ports on a network camera or video encoder can be connected to external devices such as a motion sensor or a door switch.
Manual trigger — an operator can make use of buttons to manually trigger an event.
Video motion detection — when the NVR detects certain movement in a camera’s video, an event can be triggered.
— Event Management — Responses —
Event Management
Responses
The DETEXI NVR can be configured to respond to events all the time or at certain set times. The system response configuration is based on the
NVR Task Execution Engine. When an event is triggered, some of the common responses can be configured include the following:
- Upload images for recording at specified locations and at a certain frame rate using a specified compression type and level during the course of an event.
- Activate output port: the output ports on a network camera or video encoder can be connected to external devices such as alarms or a door switch.
- Execute an external program on the DETEXI NVR, with user-defined parameters if desired.
- Send e-mail notification: this notifies users that an event has occurred. An image of the first frame of the alarm video also can be attached in the e-mail.
- Call a user-defined phone or pager and play alarm-specific or a user-defined WAV file or text-to-speech message. Has the ability to attempt multiple times on failure.
- Go to a PTZ preset: this feature may be available with PTZ or dome cameras and enables the camera to point to a specified position, such as a window, when an event takes place.
- Activate an audio alert — plays alarm-specific or a user-defined WAV file or text-to-speech message over the NVR Server soundcard.
- Enable on-screen pop-up in the DETEXI Client, showing alive video from a camera where an event has been activated.
- Show procedures that the operator should follow — send a user-defined message to be displayed on the operator’s computer.
- In addition, pre-alarm (for soft motion detection) and post-alarm (for I/O alarms or motion detection) image buffers can be set in the DETEXI NVR, enabling a network video product to send a set length and frame rate of video captured before and after an event is triggered. This can be beneficial in helping provide a more complete picture of an event.
— Event Management — Configure Alarm Server Service —
Event Management
Configure Alarm Server Service
The
Alarm Server service is responsible for
raising alarms via the
text-to-speech engine,
telephone,
e-mail and other mediums. This NVR service should be running in order to send the following alert notifications —
- Phone notification calls a user-defined phone or pager and plays alarm-specific or a user-defined WAV file or text-to-speech message. Has the ability to attempt multiple times on failure.
- eMail notification sends an alarm-specific or user-defined email to one or more user-defined email addresses. Has the ability to attempt multiple times on failure.
- Speak notification plays alarm-specific or a user-defined WAV file or text-to-speech message over the NVR Server soundcard.
- Launch Alarm Server
- Configure Voice
- Configure Phone
- Configure Mail
Launch Alarm Server Interface —
If the NVR is running the Alarm Server icon appears in the Windows taskbar tool tray. Double-click the icon to launch the Alarm Server interface. Switch to the
Voice,
Phone or
Mail configuration.
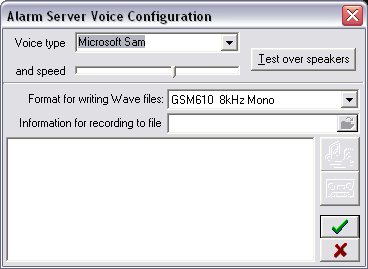
Voice Configuration —
- In the Alarm Server — Voice Configuration select Voice Type and Speed.
- By pressing the Test over speakers button, you can hear the test message.
- Select a Format for writing Wave files.
- If you want to change the default alarm message to your own, enter a new message in the Information for recording to file textbox and save the file.
- A specific alarm voice message than can be assigned to a selected camera in the NVR Control Center — Cameras —Security & Alarm (the default alarm message is assigned automatically)
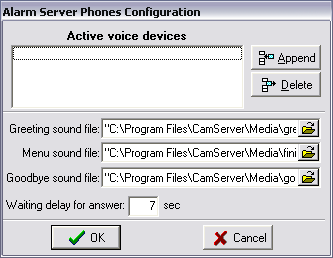
Phone Configuration
- Append voice modem hardware.
- Select appropriate sound files and Waiting delay for answer.
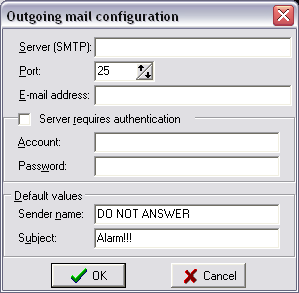
Mail Configuration
You must correctly configure the Internet e-mail information service to send messages in the NVR. To do this, you must have the following specific information about your e-mail account and configure it in the Alarm Server —
- Enter the SMTP server name or address into the Server (SMTP).
- Select the Port number that is used for SMTP (most ISPs use port 25).
- Enter your full E-mail address.
- If the outgoing e-mail server (SMTP) requires authentication check the Server requires authentication checkbox and enter e-mail account and password.
- Under the Default values enter the Sender name and the Subject line info.


 DETEXI® Network Video Management System