— Video Motion Detection —
Video Motion Detection
Video motion detection (VMD) is the original, most basic and prevalent intelligent video analysis in video surveillance. Video motion detection is a key function in the DETEXI NVR. It is a way of defining activity in a scene by analyzing image data and differences in a series of images.
Using the NVR motion detection functionality alleviates the workload for any recording devices in the system. It also reduces the use of bandwidth, in addition to storage space, and makes event-driven surveillance possible because no video (or only low-frame-rate video) is sent to the operator or recording system unless activity is detected in a scene.
The NVR provides the video motion detection functionality even to the network cameras that do not have this as a built-in feature. This means that a network camera will send video to the NVR software for analysis.
Motion can be detected in any area of an image. In addition, users may be able to set different motion detection sensitivities.
Using VMD helps in prioritizing recordings, and making searching for events easier. Motion detected data can be included in a video stream to simplify activity searches in the recorded material (scheduled with motion detection type of recording).
Once motion is detected, the NVR can trigger an external device (such as a door to open or close, a light to turn on or off), initiate recordings from selected cameras, and send e-mail alerts. Alerts also can be triggered if motion stops.
|
|
|
- The system response configuration is based on the NVR Task Execution Engine. Actions/notifications triggered by alarms or events raised in the system are called tasks. Each task is a list of predefined actions and/or notifications that define what is to happen. Any task can include one or more actions/notifications, allowing for multiple things to happen when a single alarm or event is raised.
— Video Motion Detection — Adjust Motion Settings —
Video motion detection
Adjust Motion Settings
Motion can be detected in any area of an image. In addition, users may be able to set different motion detection sensitivities. When a recording schedule has
motion detection enabled, the
Motion Settings become available to the user. These settings are not required, but can be used to optimize motion detection for each individual camera and its environment.
Motion settings apply only to the
currently selected recording schedule, allowing different motion settings to be applied to different times of day and levels of light.
- A set of motion settings can be defined as the default, which will automatically apply to all new schedules created for that camera.
- Sensitivity
- Region of Interest
Motion Indicator Graph / Roughness and Sensitivity —
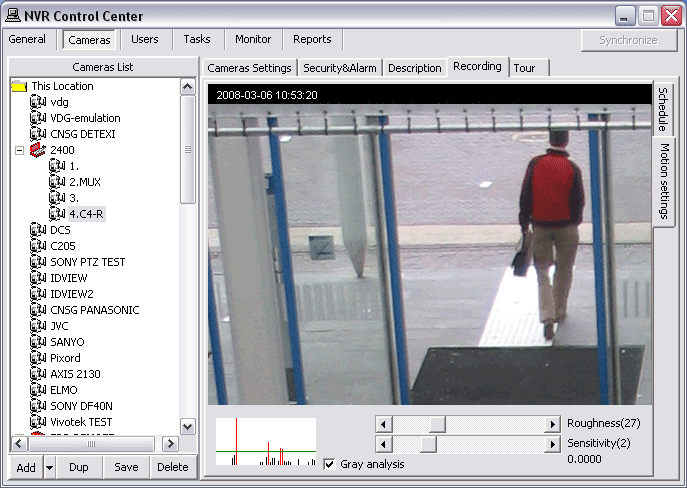
Video motion detection defines activity by analyzing data and differences in a series of images. Software algorithms continually compare images from a video stream to detect changes in an image.
The motion indicator graph (at bottom left) indicates the motion detected.
- Each vertical line in the graph indicates motion detected; the height of the line shows how much motion was detected at the moment.
- When a vertical line passes above the green horizontal line it turns red, indicating that motion detected will trigger the system reaction.
Two parameters are available for fine-tuning the system. These parameters include the
Roughness for how large an object should be for the system to trigger, and
Sensitivity for how much an image can change before the system reacts. Finding the right balance between these settings will directly impact the number of false alarms the system will give and whether all relevant motion in the scene is detected.
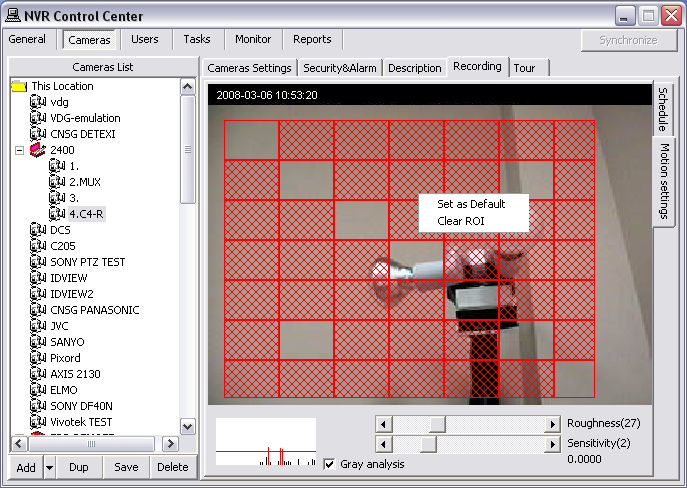
Region of Interest (ROI)
Region of interest (ROI) defines the region of the camera’s view that should be analyzed for motion. Regions that will be analyzed show
red, while motion in unpainted regions will be ignored. The ROI grid can be resized and moved, and each box within the grid can be turned on or off individually. If no ROI is defined, the entire view will be analyzed for motion.
To create a Region of Interest (ROI) for an existing recording schedule —
- In the NVR Control Center — Cameras select camera to configure from the Cameras List and switch to Recording.
- Select a recording schedule with motion detection and switch to Motion Settings right side tab.
- Draw a ROI by left-clicking and dragging from the upper left corner to the bottom right corner of the image — a red grid will be drawn, indicating where the ROI is.
- To resize ROI select the bottom right corner and drag it.
- To move ROI left-click and drag it to a new place.
- To deselect/reselect a section of the ROI click on the section holding Ctrl key.
- To clear ROI right-click and select Clear ROI.


 DETEXI® Network Video Management System


