— Administration and Management — Security —
Administration and Management
Security
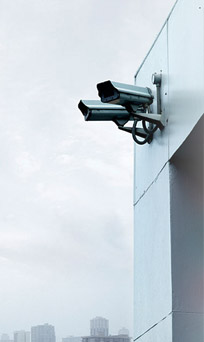
An important part of network video management is security. The DETEXI NVR enables the Remote DETEXI Client connection to any authorized DETEXI NVR available anywhere on the Internet or corporate network for remote viewing and control.
User Login Settings
When users connect to the NVR from the Remote DETEXI Clients, they will be required to authenticate with user settings defined in the NVR. The DETEXI NVR has the ability to provide different lists of cameras to different users, only allowing users to see and interact with the cameras they have privileges for.
To allow remote users authentication/connection the following to be defined and setup in the NVR Control Center —
- Authorized users
- Passwords
- Different user-access levels. For example: administrator — access to all functionalities, operator — access to all functionalities except for certain configuration pages, viewer — access only to live video.
- Which authorized users have access to which cameras
In addition, permissions such as PTZ control, maximum connection time, task control, etc. are configurable on
a per-user basis.
Camera Security Settings
A secure communication with network cameras is created in the same way by providing some kind of identity — through a username and password to the camera and the DETEXI NVR. If authentication authorized and accepted, that is, verifying whether the device has the authority to operate as requested, the device is fully connected and operational in the system.
This allows protecting the camera from an attacker who knows camera’s IP address.
— Administration and Management — Security — User Login Settings —
Administration and Management
User Login Settings
- NVR Advanced Settings
- Billing Info & Restrictions
- User Activity Reports
- View/Print Report
To create a user with
specific rights —
- In the NVR Control Center switch to Users — User Information.
- Below the Users List click Add button to open blank User Information dialog;
— or —
Click Dup button to open a copy of selected user settings for editing.
- Enter a single word, case-sensitive, alphanumeric User Name to use to login to the NVR.
- Enter a single word, case-sensitive, alphanumeric User Password and re-type it to the User Password Confirmation to be sure it is typed as desired.
- Enter the Number of Active Users to define the number of Client instances the user can be signed into simultaneously.
- Enter Max connection time to define the number of minutes user can be continuously connected to the NVR before the connection will be terminated. User may login again if desired. A value of 9999 designates no time limit.
- Check Master User checkbox to give the user permission to terminate other user sessions from the Client — Get Users.
- Check Can Search Archive checkbox to give the user permission to view/search NVR archive.
Remember that
User Cameras to Interact also
must be setup.

- Usernames and passwords are case sensitive!
- Unless otherwise configured for security reasons, it is recommended to have at least 2 Number of Active Users allowed per user. In the event that a user’s session is not logged out properly, this ensures that they can log in again without intervention from a Master User or NVR Administrator.
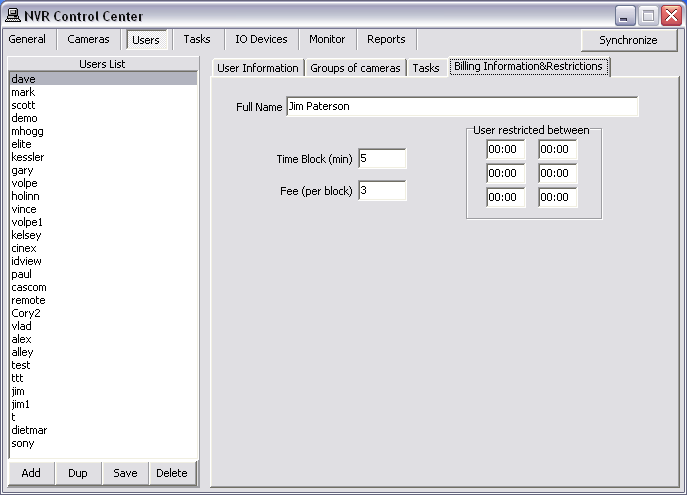
To setup a user billing information and connection time restrictions —
- In the NVR Control Center — Users select a user from the Users List.
- Switch to the Billing Information & Restrictions.
- Enter Time Block (min) and Fee (per block).
- The information will be used in the NVR Billing Module
Up to three restricted time intervals could be setup for a user when the user is banned to reach the NVR.
- Under the User Restricted Between setup each interval start and end times.
The statistic reports provide user logon information i.e. the date and time when a user has been authenticated and logged on to the NVR network and logged out as well. Monitoring this information is crucial for network administrators to track users’ activity.
- In the NVR Control Center — Reports.
- Specify the date range.
- Enter the User name or host Address.
- Click the Run button to view/print the report.
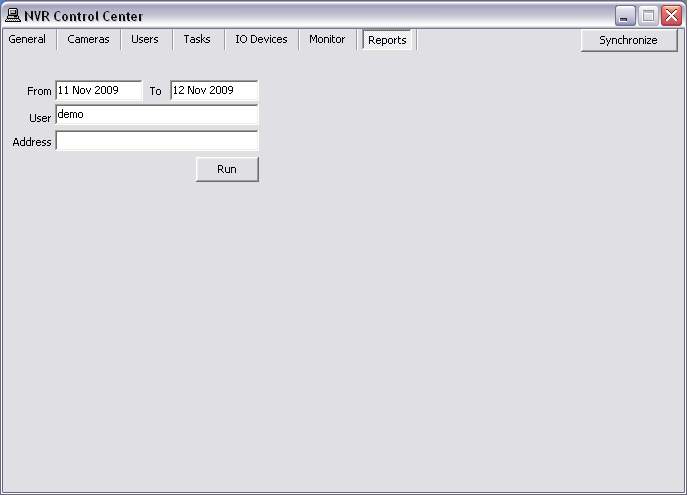
Statistic report is showing user’s activities.

— Administration and Management — Security — User Cameras to Interact —
Administration and Management
User Cameras to Interact
It is also necessary to define which of the available cameras the user has access to and also assign the level of authentication allowed from this user to the camera defined in the
NVR Control Center — Cameras — Security & Alarm.
- In most cases, the camera has only one username and password, with administrative privileges.
- Be sure that User Rights (Adm/Oper/User) settings make sense considering the authentication settings in the Security & Alarm.
To define the cameras user has access to —
- With the user selected choose the camera from the Cameras List at the left and click ">" button to add the camera permission to the user — the camera name appears in the selected cameras list at the right.
- Select the camera name in the selected cameras list at the right.
- Check proper checkbox under the User Rights to pass the previously configured camera authentication settings — Adm, Oper or User.
- Check Can PTZ checkbox below the selected cameras list to give the user PTZ permission on the selected camera. This setting is enabled by default if the camera has PTZ capabilities when assigned to the user.
- Repeat steps 1-4 to add more camera permissions.
- Click Save button below the Users List to save user settings.

- The User Rights chosen for the first camera configured will automatically be assigned to each camera after that unless manually changed.
- PTZ permission is defined on a per-camera basis, and is enabled by default if the camera has PTZ capabilities when assigned to the user.
— Administration and Management — Security — Camera Security Settings —
Administration and Management
Camera Security Settings
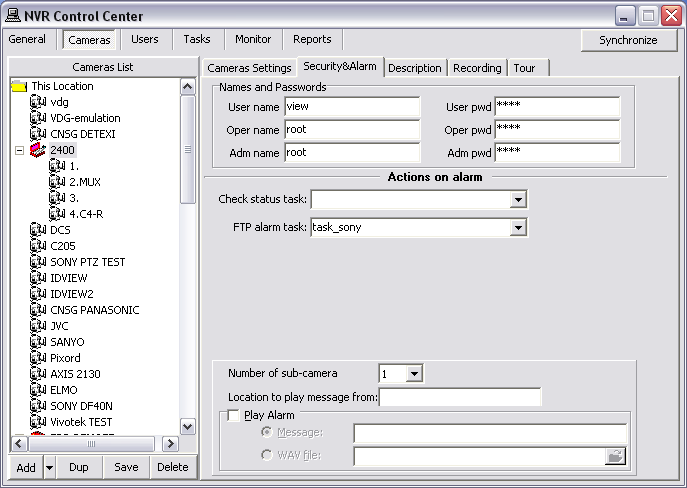
- With the camera selected switch to the Cameras — Security & Alarm .
- Under the Names and Passwords enter usernames and passwords. They should match the users that are defined within the camera.
- In most cases, camera will only have one username and password by default, with administrative privileges; in this case enter Adm name and Adm pwd accordingly.
- Click Save button to save settings under the Cameras List.
— Administration and Management — Security — User Triggered Task —
Administration and Management
User Triggered Task
User Triggered Task (from Remote Client) — task execution can be added to user permissions, by assigning users the specific tasks they are allowed to trigger manually from the remote DETEXI Client.
Setup User Triggered Task —
- In the NVR Control Center go to the Users.
- Select a user from the Users list and switch to Tasks.
- Select a task of interest in the Available list and press the direction button to move the selected task to the Selected list.
- Add more tasks to the Selected list if necessary.
- Press Save button under the Users list to save changes.
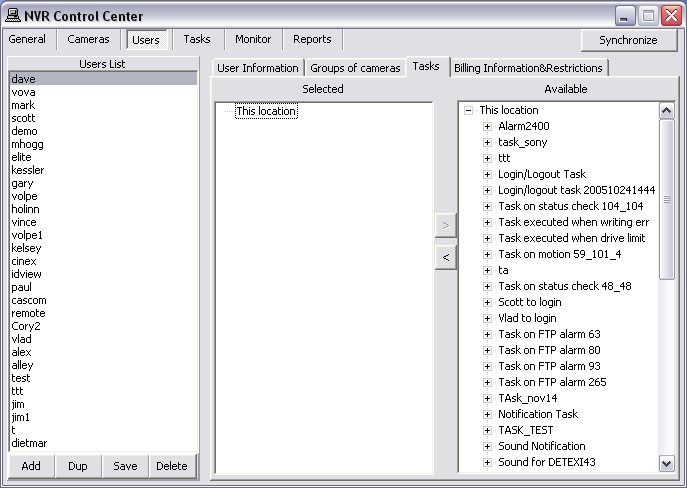
- Tasks configured with alarm-specific information should not be triggered as no alarm-specific information will be available.
Trigger Task (from remote Client) —
- Login to the remote DETEXI Client.
- On the Client Start Page press the Tasks button to launch Execute Task panel with the tasks available upon the user logged in permissions.
- Select a task of interest and press Start Task button


 DETEXI® Network Video Management System

 An important part of network video management is security. The DETEXI NVR enables the Remote DETEXI Client connection to any authorized DETEXI NVR available anywhere on the Internet or corporate network for remote viewing and control.
User Login Settings
When users connect to the NVR from the Remote DETEXI Clients, they will be required to authenticate with user settings defined in the NVR. The DETEXI NVR has the ability to provide different lists of cameras to different users, only allowing users to see and interact with the cameras they have privileges for.


